

Today, we're going to look into two pieces of technology that I've recently come across and have been having a lot of fun with: Nitro from unjs and Kamal from 37signals.
Kamal is a toolkit developed by 37signals. It's designed to deploy web applications to various environments, ranging from bare metal to cloud VMs, using containerization tools like Docker. It's compatible with any web application that can be containerized. As DHH puts it, "it gives plain cloud hosts like Hetzner the deployment ergonomics of something like Heroku but at a sliver of the cost."
Nitro, on the other hand, is a typescript framework for building web applications. I like to think of it as a modern version of Express with a lot of batteries and some really cool features. It's designed to be fast, simple, and easy to use. It's also designed to be extensible, so you can add your own features to it.
This tutorial will show you how to create a Nitro web server, containerize it using Docker, and deploy it to a VM on Hetzner using Kamal. We'll also look into how to scale up our application across multiple servers and set up load balancing for our application.
Creating a Nitro Project
First, we need to start a new Nitro project.
- Run the following command to create a new Nitro project:
- Once the project is created, navigate to the project directory using the following command:
- Now, run the following command to install the dependencies:
- Create a git repository for the project using the following command:
That's it! We've successfully created a new Nitro project. Now let's create our first route.
Creating a Route
Nitro supports filesystem routing, where handler files inside the api/ and routes/ directories are automatically mapped to routes.
For the purpose of this tutorial, we're going to create a simple route that returns a JSON response. Let's create a new file named users.ts inside the routes/ directory and add the following code to it:
This code will create a new route at routes/users that returns a JSON response with a list of users. Now, let's start the server and test our route.
Starting the Server
To start the server, run the following command:
This command will start the server in development mode. It will also watch for changes in the source code and automatically restart the server when a change is detected.
Now, open your browser and navigate to http://localhost:3000/users. You should see the following response:
Adding a Health Check Endpoint
Our application is now running on our local machine. However, we need to add a health check endpoint to our application so that we can monitor the health of our application.
This endpoint is required by Kamal to check if the application is running or not. If the application is not running, Kamal will automatically restart the application.
To create a health check endpoint, create a new file named up.ts inside the routes/ directory and add the following code to it:
For now, this endpoint will always return a 200 OK response. Later on, you can add your own logic to this endpoint to check if the application is running or not.
That's it! Now that we have created our web server, let's deploy it to a VM on Hetzner using Kamal.
Dockerizing the Application
Before we can deploy our application, we need to containerize it using Docker. If you don't have Docker installed on your system, you can download it from the official website.
Once Docker is installed, we need to create a Dockerfile for our application. Create a new file named Dockerfile in the project directory and add the following code to it:
Setup Your Hetzner Account
Before we can deploy our application, we need to set up a VM on Hetzner. If you don't have an account on Hetzner, you can sign up for a free account here.
Just as a note, you may use any other cloud provider for this tutorial, there's nothing specific to Hetzner here and the same steps can be applied to any other cloud provider.
Creating a VM
Once you have signed up for an account, log in to the Hetzner Cloud Console and create a new project. Once the project is created, click on the "Create Server" button to create a new server.
Select the "Ubuntu 20.04" image and choose any location and server type you want. I'm going to get the smallest server type for this tutorial and place it in Helsinki, Finland.
Finally, add your SSH key, give your server a name (I'm going to name it "nitro-app-1"), and click on the "Create & Buy" button to create the server.
All we need here is the IP address of the server. Once the server is created, you can find the IP address under the "Servers" tab in the Hetzner Cloud Console. Mine is 95.216.166.228.
That's it! We've successfully created a new VM on Hetzner. Now let's connect to the server and install Kamal.
Setting up Kamal
First, we need to install Kamal on our local machine. If you have Ruby installed on your system, you can install Kamal using the following command:
If you don't have Ruby installed, you can install Kamal using Docker via the following command (for macOS):
Once Kamal is installed, head to the project directory and run the following command to initialize Kamal:
This command will create a new file named deploy.yml under the 'config/' directory. This file contains all the configuration options for Kamal. (I wish they had called it kamalfile instead 😂)
In addition, it will create a .env file under the project directory. This file contains all the environment variables that are required by Kamal.
Let's update our config/deploy.yml file to add our server details:
Replace username with your Docker Hub username and the IP address under servers with the IP address of your server. Also, you need to update the KAMAL_REGISTRY_PASSWORD environment variable in the .env file with your Docker Hub password.
If you don't have a Docker Hub account, you can create one for free here.
That's it! We've successfully configured Kamal. Now let's deploy our application.
Deploying the Application
Finally, we're ready to deploy our application. To deploy the application, run the following command:
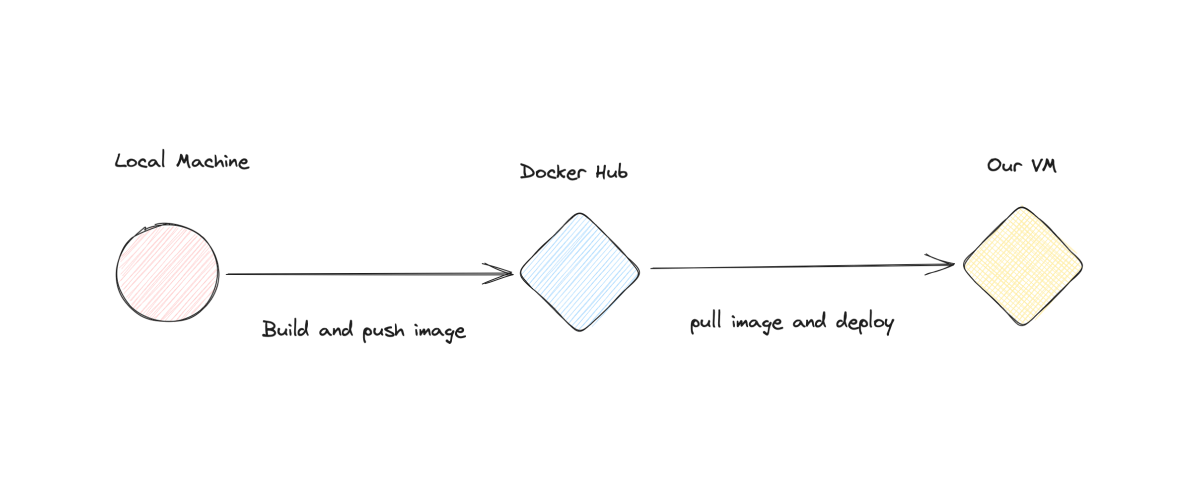
In summary, this command will build the Docker image, push it to the registry, pull it from the registry onto the server, and start a new container with the latest version of the application.
Once the command is finished, we should be able to access our application by making a request to the IP address of our server. Let's test it out.
Make a request to http://95.216.166.228/users and you should see the following response:
(This is my IP address, you should replace it with your own IP address)
That's it! It works like a charm! 🎉
Here's how the deployment process works:
Deploying a New Version
Now that we have deployed our application, let's make some changes to the application and deploy a new version of the application.
Let's add a new route to our application that returns a list of posts. Create a new file named posts.ts inside the routes/ directory and add the following code to it:
Now, let's deploy the new version of the application. To deploy the new version, run the following command:
It will take a few seconds for the new version to be deployed. Once the new version is deployed, make a request to http://95.216.166.228/posts and you should see the following response:
Isn't that awesome? 🤩
Scaling the Application
Alright, we have now successfully deployed our application and a lot of people are using it, we have already scaled up our VM to the maximum capacity, but we still need more capacity to handle the load.
This is where Kamal comes in. It makes it extremely easy to scale up our application across multiple servers. Let's see how we can do that.
First, head back to the Hetzner Cloud Console and create a new server. I'm going to get another server with the same configuration as the first one and place it in Helsinki, Finland. This time, I'm going to name it "nitro-app-2".
Now, all I need to do is add the IP address of the new server to the servers array in the config/deploy.yml file.
Finally, run the following command to deploy the new version of the application:
This command will set up all the requirements on the new server and deploy the new version of the application. Once the command is finished, we should be able to access our application by making a request to the IP address of our new server.
Make a request to http://65.109.175.191/users and you should see the following response:
And if we make the request to the IP address of our first server, we should see the same response.
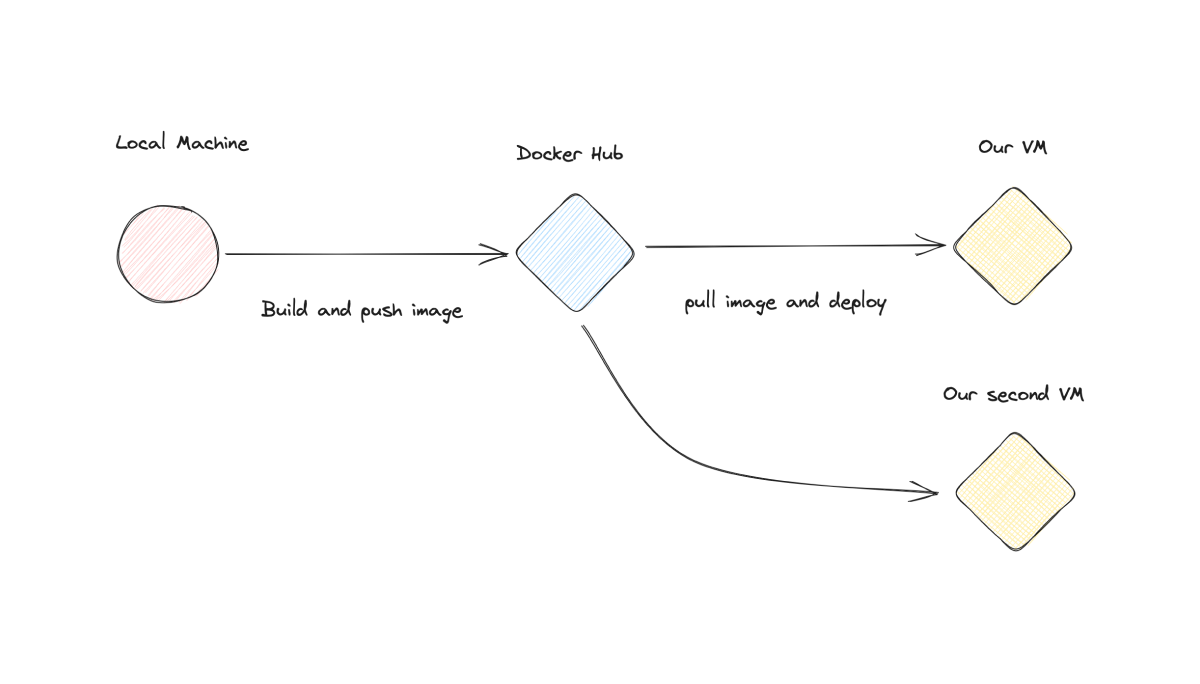
Again, it was that easy! 🤯 We now have two servers running our application and we can scale up our application to as many servers as we want.
Here's how the scaling process works:
Load Balancing
You may be asking me, "We have two servers running our application, but how do we know which server to make the request to?"
Well, that's where load balancing comes in. Load balancing is the process of distributing the load across multiple servers. It ensures that no single server is overloaded and that all servers are running at optimal capacity.
Most cloud providers, including Hetzner, provide load balancing as a service. Let me show you how to set it up for our application.
Setting up Load Balancing on Hetzner
First, head back to the Hetzner Cloud Console and click on the "Load Balancers" tab. Then, click on the "Create Load Balancer" button to create a new load balancer.
Select the same location as your servers and give your load balancer a name.
Under Targets, select the two servers that we created earlier. This will ensure that the load balancer will distribute the load across both servers.
Under Services, select HTTP and enter port 80 for both Frontend and Backend. This will ensure that the load balancer will listen on port 80 and forward all requests to port 80 on the servers.
Here, we're going to use the health check endpoint that we created earlier to check if the application is running or not. Under Health Checks, select HTTP and enter /up for Path. This will ensure that the load balancer will check if the application is running or not by making a request to /up on the servers.
Finally, give it a name, I'm going to name it "nitro-app-lb", and click on the "Create Load Balancer" button to create the load balancer.
Testing the Load Balancer
Once the load balancer is created, we should be able to access our application by making a request to the IP address of the load balancer.
In my case, the IP address of the load balancer is 95.217.174.212 and I can access my application by making a request to http://95.217.174.212/users and I should see the following response:
Our load balancer is now working as expected and distributing the load across both of our servers in a round-robin fashion. This means that if we make a request to the load balancer, it will forward the request to one of our servers and then forward the next request to the other server.
You can change the load balancing algorithm by clicking on the "Load Balancers" tab in the Hetzner Cloud Console and then clicking on the "Edit" button next to the load balancer. Here, you can select the load balancing algorithm that you want to use.
You can also check the status of the load balancer by clicking on the "Load Balancers" tab in the Hetzner Cloud Console. If everything is working as expected, you should see a green checkmark next to the load balancer.
Wrapping Up
That's pretty much it! We've successfully deployed our application to a VM on Hetzner using Kamal. We've also scaled up our application across multiple servers and set up load balancing for our application.
Both Nitro and Kamal offer a lot of features that we didn't cover in this tutorial. I highly recommend you to check out their documentation to learn more about them.
You can use the same steps to deploy other applications such as Next.js, Astro, SvelteKit, or any other application that can be containerized.
Interested in LogSnag?