
So, you're building a SaaS, or perhaps contemplating the idea of building one. You've got a fantastic idea, and you're ready to get started. But wait, you want to offer vanity subdomains to your users, like status.yourdomain.com, and you have no idea how to do that. Well, you've come to the right place. In this blog post, I'm going to show you how to set up vanity subdomains for your SaaS using Caddy and provision SSL certificates on the fly using Let's Encrypt.
What is a Vanity Subdomain?
Let's say you're building an uptime-monitoring service for websites, and you create a cute little status page for your users. They get to choose a theme, and they can customize the page to their liking. Maybe you even offer them a custom subdomain such as acme.status.com, and it all works great for a while. But then, you get a new enterprise customer, and they want to use their domain for the status page because, you know, branding and stuff. So now you are faced with a problem: how do you allow your users to use their domain for their status page?
Well, that is what we call a vanity subdomain. It's a subdomain that your users create, and that points to your service. In our example, it would be status.acme.com. And that's what we're going to set up today.
What are the Options?
There are many ways to set up vanity subdomains for your SaaS. You could use a third-party service, such as Cloudflare, or pretty much any other DNS or PaaS provider. These are great options, but chances are you may be concerned about vendor lock-in, or you may want to have more control over your infrastructure, or at the very least, you may be curious about how you could do it yourself. And that's what we're going to do today.
Create a Web App
Alright, first and foremost, we need to have some sort of web app that is going to handle the requests for our vanity subdomains. For this example, I'm going to use a simple Next.js app with a single page at the index for now.
I will then deploy this app to a VM using Docker and Docker Compose. This step is entirely up to you, and you can deploy your app however you want. Therefore, I will skip the details of this step.
At this point, we have our Next.js app running on a public IP address on port 3000. We can access it by going to http://[ip]:3000.
Perfect, now let's move on to the next step.
Setting Up Caddy
Caddy is a web server designed to be easy to use, and capable of handling a wide variety of use cases. It's also very easy to set up, it's fast, and most importantly, it makes it very easy to provision SSL certificates on the fly using Let's Encrypt. And that's exactly what we're going to use it for.
First, we need to install Caddy. You can find the installation instructions here.
Once you have Caddy installed, you can run the version command to make sure it's installed correctly.
You should see something like this:
Now, we need to create a Caddyfile. This is where we will configure Caddy to handle our requests. Create a file called Caddyfile in the root of your project, and add the following:
Let's break this down; The first line is the email address that will be used to provision SSL certificates using Let's Encrypt. The second line is the address and port that Caddy will listen on. In this case, we're listening on port 80, which is the default port for HTTP. The third line is where we configure Caddy to reverse proxy requests to our Next.js app running on port 3000. This means that when a request comes in, Caddy will forward it to our Next.js app, and then return the response to the client.
Now, we can run Caddy using the following command:
Note: if Caddy is already running, you can use caddy reload --config Caddyfile to reload the configuration.
Now, if you go to http://[ip] you should see your Next.js app running.
To get a better understanding of how our setup works, let's take a look at a diagram:

Setting Up Our Domain
Alright, now that we have Caddy running and it can forward requests to our Next.js app, we need to set up our domain. For this example, I'm going to use acme.com as an example.
Head to your DNS provider and create an A record for acme.com that points to the IP address of your server, and a CNAME record for www.acme.com that points to acme.com. Here's how your DNS records should look like:
| Type | Name | Value |
|---|---|---|
| A | acme.com | [ip] |
| CNAME | www.acme.com | acme.com |
Now, if you go to http://acme.com you should see your Next.js app running. However, if you go to https://acme.com you will get an error. This is because we haven't set up SSL yet. Let's do that now. Let's quickly fix that.
Setting Up SSL
Caddy makes it very easy to provision SSL certificates on the fly using Let's Encrypt. All we need to do is add the following to our Caddyfile:
Now, if you run caddy reload --config Caddyfile you should see that Caddy is trying to provision an SSL certificate for acme.com. If everything goes well, we should be able to access our app using https://acme.com.
Perfect! It's that easy to set up Caddy as a reverse proxy and provision SSL certificates on the fly using Let's Encrypt. Now, let's move on to the next step.
How We're Going to Set Up Vanity Subdomains
Right now, our website is up and running on acme.com, and we've got SSL certificates in place for acme.com. The next step is to create vanity subdomains for our users.
What we're planning to do is create a wildcard subdomain for our customers, like this: *.customer.acme.com. Then, our customers will create a CNAME record for their chosen vanity subdomain, which will point to *.customer.acme.com. For example, if we have a customer who uses example.com and they want status.example.com as their vanity subdomain, they will need to create a CNAME record for status.example.com that points to example.customer.acme.com.
This means that when someone requests status.example.com, it will resolve to example.customer.acme.com, which will then hit our server, and Caddy will forward it to our Next.js app, and then return the response to the client.
Setting Up Vanity Subdomains
Let's give this a try, let's create a wild card A record for *.customer.acme.com that points to the IP address of our server. Here's how your DNS records should look like:
| Type | Name | Value |
|---|---|---|
| A | acme.com | [ip] |
| CNAME | www.acme.com | acme.com |
| A | *.customer.acme.com | [ip] |
Now, our customers can create a CNAME record for their chosen vanity subdomain that points to *.customer.acme.com. Here's how their DNS records should look like:
| Type | Name | Value |
|---|---|---|
| CNAME | status.example.com | example.customer.acme.com |
Now, if you go to http://status.example.com you should see your Next.js app running. However, if you go to https://status.example.com you will get an error. This is because we haven't set up SSL yet. And this is the core of the problem we're trying to solve today.
Provisioning SSL Certificates On-Demand Using Caddy
Caddy has a nice handy feature called on-demand TLS. This feature allows Caddy to provision SSL certificates on the fly using Let's Encrypt. This means that when a request comes in for a domain that doesn't have an SSL certificate, Caddy will automatically provision one for it.
A nice feature of on-demand TLS is that it requires us to define an endpoint that Caddy will send an HTTP request to ask if it has permission to obtain and manage a certificate for the domain in the handshake. This means that we have fine-grained control over which domains we want to allow to be used as vanity subdomains. And that's exactly what we're going to do.
Before we get to implementing this feature, here's a quick diagram of how it works:
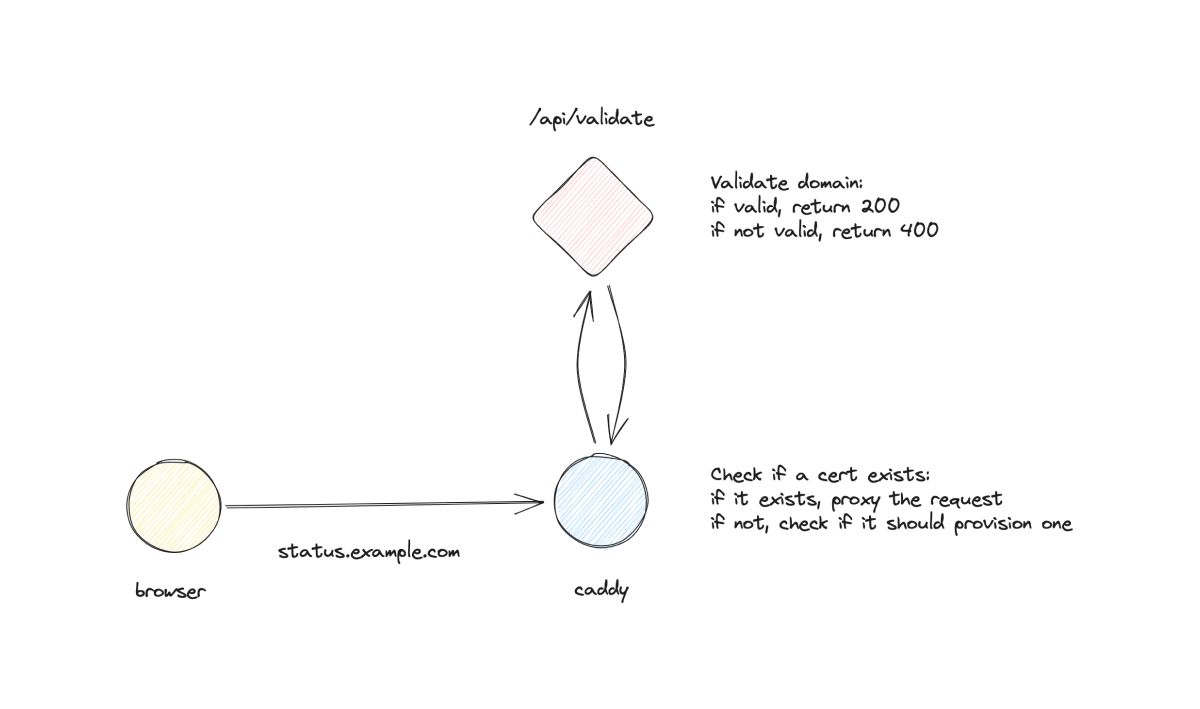
To implement this, let's define an API endpoint in our Next.js app that will take a domain as a parameter, do some validation, and then return a response to Caddy. Here's how our Next.js app should look like:
Just to make sure everything is working as expected, let's try to access this endpoint using https://acme.com/api/validate?domain=example.com. You should see a response like this:
Now, let's update our Caddyfile to use on-demand TLS. Here's how our Caddyfile should look like:
Let's review what we've done here. First, we've added an on_demand_tls block to our Caddyfile. This block defines the endpoint that Caddy will send an HTTP request to ask if it has permission to obtain and manage a certificate for the domain in the handshake. In our case, we're using https://acme.com/api/validate. This means that when a request comes in for a domain that doesn't have an SSL certificate, Caddy will send an HTTP request to https://acme.com/api/validate to ask if it has permission to obtain and manage a certificate for the domain in the handshake. If the response is 200, Caddy will provision an SSL certificate for the domain. If the response is anything else, Caddy will return an error.
Next, we've added a :443 block to our Caddyfile. This block defines the address and port that Caddy will listen on for HTTPS requests. In this case, we're listening on port 443, which is the default port for HTTPS. We've also added a tls block to our Caddyfile. This block defines the TLS configuration for the server. In this case, we're using on_demand to enable on-demand TLS.
Now, if you run caddy reload --config Caddyfile and go to https://status.example.com, Caddy will send an HTTP request to https://acme.com/api/validate to ask if it has permission to obtain and manage a certificate for status.example.com. If the response is 200, Caddy will provision an SSL certificate for status.example.com. If the response is anything else, Caddy will return an error.
The first time you access https://status.example.com, it will take a few seconds to provision the SSL certificate. However, if you try to access it again, it will be much faster because Caddy will use the cached certificate.
Dynamically Rendering Content Based on the Domain
So far, all of our requests have been handled by our Next.js app the same way regardless of the domain. In other words, we've been rendering the same content for all domains. However, we want to be able to render different content based on the domain. For example, if someone requests https://status.example.com, we want to render a status page for example.com. And if someone requests https://status.acme.com, we want to render a status page for acme.com.
To do this, we can simply use the request headers to get the domain, and then render the content based on the domain. For example, in our index page, we can use the getServerSideProps function to get the domain from the request headers, and then render the content based on the domain. Here's how our index page should look like:
Now, if you go to https://acme.com you should see Hello world from acme.com, and if you go to https://status.example.com you should see Hello world from status.example.com.
You can use this technique to render different content based on the domain. For example, you can render a status page for example.com and a status page for acme.com.
URL Rewriting
To make things even better, we can use Caddy to rewrite the URL to make it look like the request is coming from the domain. For example, if someone requests https://status.example.com, we can rewrite the URL to https://acme.com/status/example.com. This will make it easier for us to render different content based on the domain.
To do this, we can use the rewrite directive in our Caddyfile. Here's how our Caddyfile should look like:
So, what we've done here is we've added a handle block to our Caddyfile. This block defines the request matcher. In the first line, we are excluding the /_next/* path from the rewrite rule. This is because we don't want to rewrite the URL for the static assets. In the second line, we are rewriting the URL to https://acme.com/status/example.com. This means that when someone requests https://status.example.com, Caddy will rewrite the URL to https://acme.com/status/example.com. And in the third line, we are forwarding the request to our Next.js app.
Building the Dynamic Status Page
Now that we are able to render different content based on the domain, we can build a dynamic status page for our customers. For example, we can render a status page for example.com and a status page for acme.com.
First, let's create our page, pages/status/[slug].tsx. Here's how our page should look like:
Now, if you go to https://status.example.com you should see Status page for example.com, and this is because we're using the domain as the slug. We can then use the slug to render different content based on the domain.
Wrapping Up
And that's it! We've successfully set up vanity subdomains for our SaaS using Caddy and provisioned SSL certificates on the fly using Let's Encrypt. We've also built a dynamic status page for our customers.
Interested in LogSnag?